
Facebook Business Manager is a powerful tool for businesses that need multiple people involved in managing Facebook and Instagram, have multiple assets to manage, or want deeper insights into audiences and targeting. This is a quick guide to help your team get up and running quickly.
Step 1: Create Your Business Manager
This is fairly straightforward: Make sure that you are logged into Facebook with the profile that you use to manage your business page(s). Then, navigate to https://business.facebook.com and follow the prompts to set up your business manager. If you have multiple pages that you manage, choose a name for your Business Manager that makes sense for all of those pages. Facebook will limit you to two Business Managers per profile.
Step 2: Add Your People
Business Manager can be tough to navigate at first. If you feel lost keep these 2 things in mind:
- The "Business Settings" page is your best friend. Depending on what screen you are on, there will be a blue button at the top right to help you get there, or you can use the giant pop up menu accessed by clicking on the three lines and "business manager" at the top left of the page. Business settings is on the far right column of that menu.
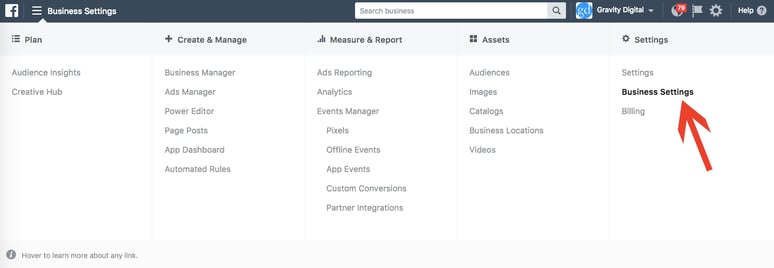
- Alternatively, you can find just about anything you are looking for by using the search bar at the top of business manager. I use the search feature frequently to navigate to "audiences".
Once you have found your way to the Business Settings page, you will see a long list of assets in the far left column and you should have selected "people" by default. At the top of the next column to the right, there is a blue "Add" button. Use this to add everyone on your team that you want involved in your Facebook/Instagram marketing activities. You will want to invite your team using the email addresses that they use to login to Facebook. They will receive a notification in their Facebook profile to accept their new role in Business Manager.
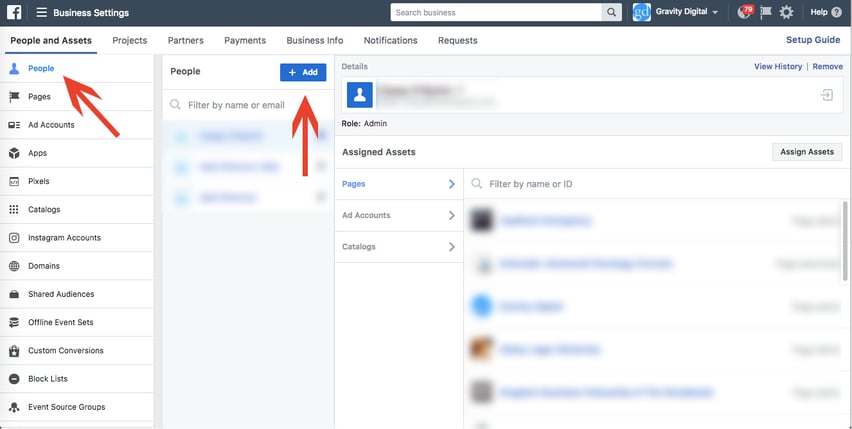
There are two "role" options that you can choose for each person: Employee or Admin. Keep in mind that these roles are not connected to each person's role on your various assets (like your page). You will be able to assign a role for each person to your various assets after they are created and connected to Business Manager. For example, an "employee" on Business Manager could be an Admin for your Page and Ad Account. Choose Admins for your Business Manager that you want to allow to manage the rest of your team. They will have the ability to set asset roles as well as add and remove new team members and assets.
Step 3: Add Your Assets
From the Business Settings page, make your way down the column on the left item by item, adding the assets that are relevant to your business.
Pages
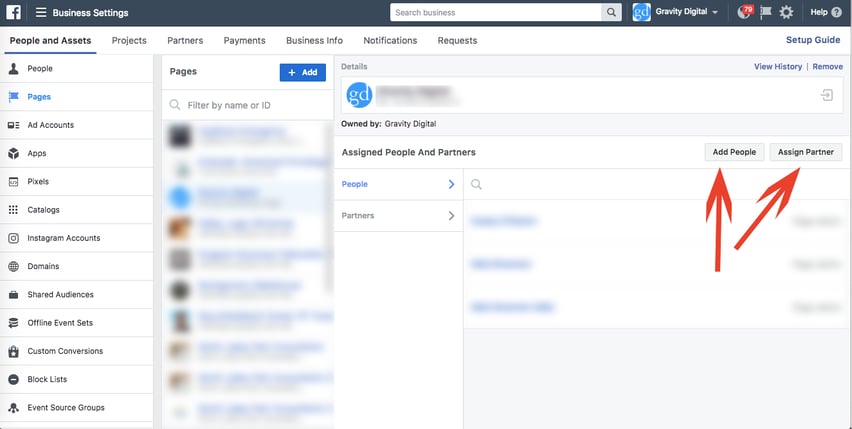
Click on the Blue "Add" Button in the middle column and add your page. Because you are using the same profile for Business Manager that you use to manage your Page currently, the Page should be added immediately. If you're in a more complex situation where someone else is the Page admin and not on your Business Manager, you will have to request permission and they will have to approve it. You will be promted to assign your People to your Page and select their Roles. Explanations of each Page Role can be found here.
Add all of the Pages that you own and want managed through Business Manager and assign your People to them. If you work with another organization (like an agency) that you want to grant access to your Page (or other assets), select the "Assign Partner" button on the far right of the right column. You can assign a role for the Partner when you add them and edit it at any time.
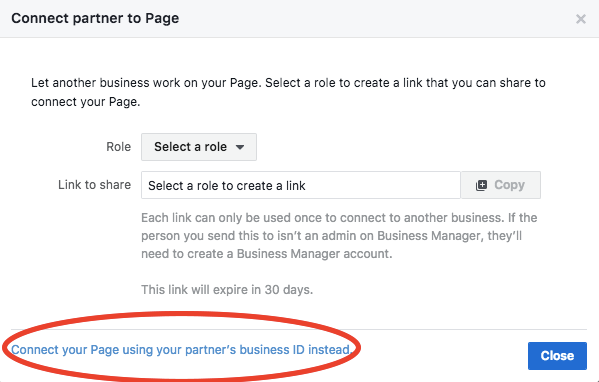
Tip: We've found it's easiest for Partners to be added by clicking on the blue link at the bottom of the Assign Partner pop-up window and then inserting the Partner's Business ID. They should be able to provide this to you (it is the number at the end of the url when logged into Business Manager.
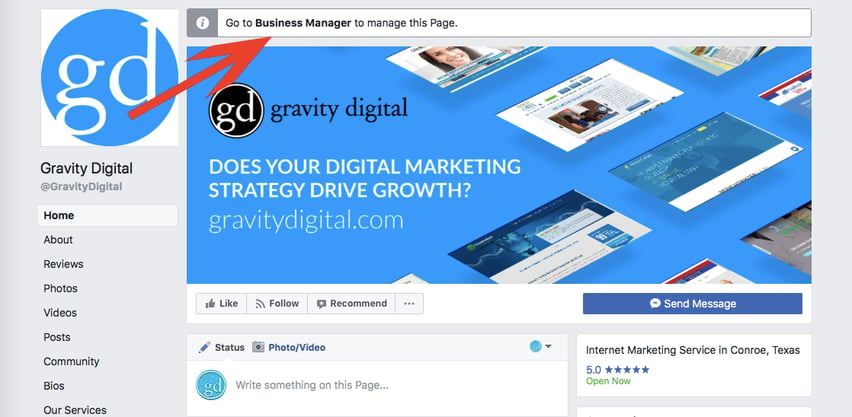
You'll notice when you visit your Page from desktop that there will now be a link at the top of the Page that says "Go to Business Manager to manage this Page". Other than that, you will be able to edit the page the same as before. On mobile, you will need to use the Pages App.
Ad Accounts
The next asset to set up is Ad Accounts. The process is similar to Pages, use the Blue "Add" button to add your Ad Accounts and then add your People and Partners and select their roles. Details of Ad Account Roles/Permissions can be found here. If you are adding multiple accounts, name them in a way that helps you stay organized (<business 1 name> ad account, <side hustle name> ad account, etc.)
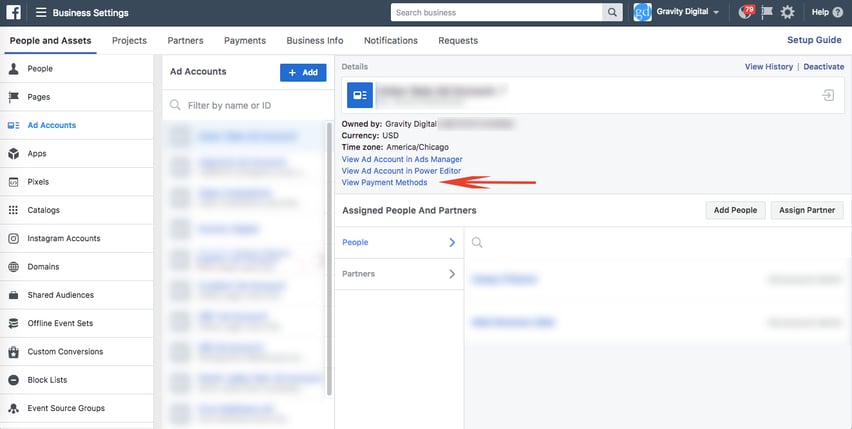
Once your Ad Account(s) is created and Permissions are assigned, click on the small link in the greyish/blue box at the top right that says "View Payment Methods". From the next screen you can add your Credit Card, Bank, or PayPal information that you want to use to pay for your ad campaigns.
Navigate back to Business settings to continue adding more assets.
Pixels
A pixel is a piece of code that is installed on your website that allows you to do some very powerful things with Facebook ads. If you want to do either of the following you should create and install a pixel on your website:
- Create Custom Audiences for ad targeting based on people who have visited your website, specific pages of your website, spend a certain amount of time on your website, added items to their cart or downloaded specific materials, etc. You can also create Lookalike Audiences that will find people similar to those who have performed certain actions on your site.
- Track the effectiveness of your ads by knowing which ones resulted in action on your website. You can even tie dollar values to certain website activity so that you can determine your return on investment and cost per acquisition of your ad campaigns, ad sets, and specific ads.
To create your pixel, select "Pixels" from the left column of the Business Settings page, and then click the blue "Add" button from the middle column. Unless you are somewhat savy with adding code to your site, you may need the help of your developer to install it. Facebook will walk you through the process or provide you with instructions that you can email to someone who can help you. Be sure to add the "events" and their value if applicable to appropriate pages in order to track and assign value to specific actions through your ad campaigns. Event options include:
- View Content
- Search
- Add to Cart
- Add to Wishlist
- Initiate Checkout
- Add Payment Info
- Purchase
- Lead
- Complete Registration
Create a separate pixel for each website that you manage and name the pixels accordingly. After the pixel is created and installed, assign any Partners that you want to give access to the Pixel and most importantly, be sure that it is connected to an Ad Account. From the Business Settings page (with Pixels selected) you can accomplish these tasks by clicking the buttons "Assign Partner" and "Assign Ad Accounts" on the far right side of the page. If you do not connect your pixel to an ad account, you will not be able to create audiences or track ad effectiveness with it.
Catalogs
Catalogs are used primarily for e-commerce businesses that want to run dynamic ads for their products. To add a catalog, click the blue "Add" button and follow the prompts. The products on your site will need to be configured in a specific way, so you will likely need the help of a developer to get your catalog set up correctly.
After your catalog is created, you can assign People, Partners, Add Items, or Associate Sources.
Instagram Accounts
If you want to run ads on Instagram that are connected to your Instagram business profile, you can do that by adding that profile to Business Manager and assigning an ad account to it. By now, you should be familiar with the process. From the Business Settings page, select "Instagram Accounts" from the left column and then click the blue "Add" button from the middle column. Provide your login info for Instagram and then assign an Ad Account using the "Assign Ad Accounts" button on the far right. You can also assign a Partner if needed.
We've covered the primary assets above, but you will notice that there are several more. Once you become familiar with navigating Business Manager, you should have no problem adding and editing any assets required for your business.
Did you run into trouble or wish we'd gone into more depth on a particular section? Anything to add that might help other? We'd love to hear from you in the comments.


 About the Author
Matt Brannon
About the Author
Matt Brannon
Matt graduated from Baylor University in 2003 and married his college sweetheart Ginny. They moved to Austin and Matt began working for Governor Rick Perry, first as an Advance Man and then later as the Governor’s Executive Aide. In 2007, Matt and Ginny moved to Los Angeles where Matt worked in public relations for an independent film (and Toronto Film Fest winner), “Bella”. His primary role was implementing grassroots efforts on a new online network called “Facebook”. After the promotion of Bella came to an end, Matt worked various jobs in entertainment and also spent 5 years working at Cedars-Sinai hospital. in 2013, Matt and Ginny moved back to their home state of Texas and joined the team at Gravity Digital. Matt’s distinctive value for his clients is his ability to bring out-of-the-box ideas and solve problems creatively.
Follow Matt Brannon:
LinkedIn |
Twitter
